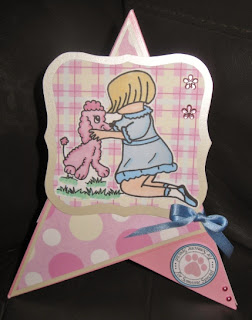
I thought I'd share with you a tutorial I've done on how to make a teepee card. They are actually so simple, but I think very effective, and are getting really popular at the moment.
HOW TO MAKE A TEEPEE CARD
For your card you will need 3 x 6" squares of card (the illustration shows 2 different colours, but it works best when they are all the same.)
Score each piece of card from corner to corner.
Take one piece of card and overlap it with another....lining up the edge of one with the crease in the other.
Use a strong adhesive to glue the pieces together (I use a strong DST.)
Repeat again with the 3rd piece of card, overlapping the 2nd.

Your card should look like this:
At this point, I add the matted/layered DPs. You CAN add them BEFORE sticking the panels together, but I prefer to do it AFTER, as it is much easier to work out where to put them!
Make your panels as required. I used cream card and my DPs.


Adhere the next 2 panels as shown.
(Optional: You CAN add small triangles of a contrasting DP to the bottom of panels, but for this tutorial, I have left them blank.)
Your card should look like this:

(The blank pink panel on the top left will tuck under the top right hand decorated panel when the card is put together.)
To keep the card sturdy/enable it to stand up, hold it in the desired 'finished' position, and use a hole punch to pierce holes for a ribbon.
Thread the ribbon through the holes and tie a bow. Your card will now stand up...yay! Alternatively, you can use velcro dots on the inside of the card to secure.

Next you need to make your topper. I used Polly with Poodle, from The Crafty Pad Designs, and coloured her using Promarkers.
I used nesties to make a panel with a contrasting DP and cream pearlescent card.
Then I attached Polly with foam pads.
Attach the topper panel using foam pads to the front of your card.
Add any further embellishments you want to finish. I have used The Crafty Pad Designs circle sentiment Someone Special and replaced the rose image in the centre with a pink paw print, to tie in with the poodle theme!
A couple of flower-gems and flat-backed pearls and the card is complete!
Undo the ribbon and the card will fold flat for posting. It will fit into a C5 envelope.
I do hope you found this useful....? I'd love to see any cards you make too, so please drop back and give me the link to your work, and I'll pop on over and leave you some love!
















.gif)


4 comments:
Love it Ali - will definately have a go at one of these!!
have to try this one. Thanks for sharing!
Love n hugs
Marie
Thanks Ali, it's a fab tutorial!
You can see the card I made over at
http://dawn-dawnscrafting.blogspot.com/2011/07/another-gdt-card.html
Thanks again!
Hugs
Dawn xx
Thank you so much for a fantastic tutorial Ali ! I love your card ! I've got to try one soon ! Hugs and love from Catherine
Post a Comment